# Projects
While most users will use a mobile device in the field to collect data for Projects, the Desktop App provides almost all the features of the mobile app for data collection, as well as a few more for managing Projects.
To work with Projects you can select Projects from the left side bar, you can select View → Projects from the top menu bar or you can use the shortcut Ctrl/⌘+1.
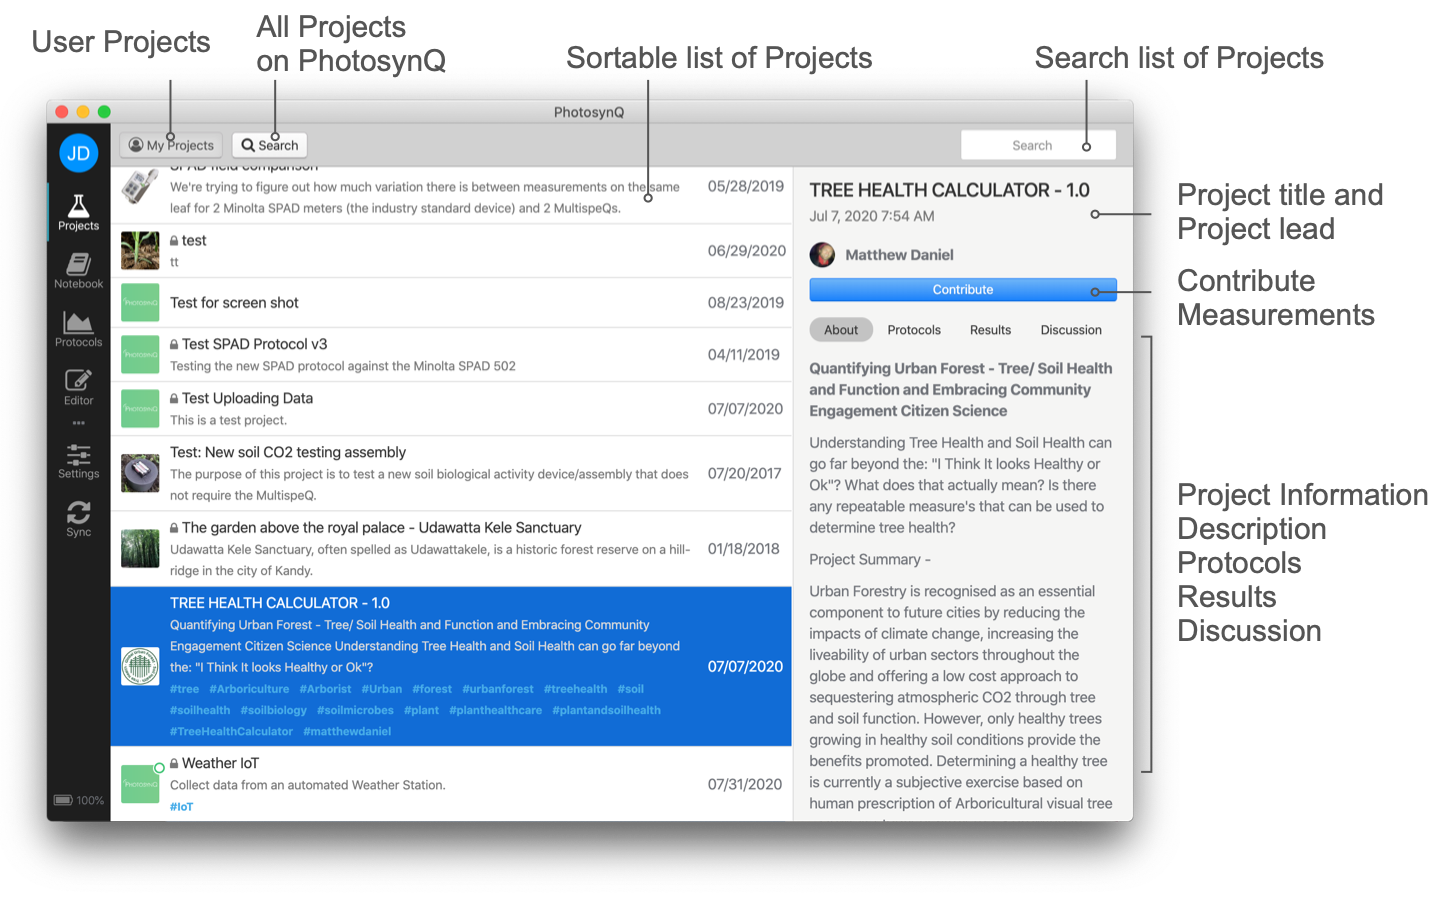
# My Projects
When working with Projects, you will find a list of all the Projects you have join under My Projects. You can sort the list of Projects, by clicking on the table headers.
A single click will bring up details about the Project in the right side bar, a double click will bring up the Project contribution with the Project questions. You can use the up and down arrow keys to navigate within the list.
If you create a new Project on the website, it will be automatically listed in your Desktop app under My Projects* as well. In case the Project is not available in the list, try to synchronize the app, selecting Synchronize from the left menu bar, File → Synchronize from the top menu bar or the shortcut Ctrl/⌥+Alt/⌘+S.
# Select a Project
When you select a Project from My Projects or from search results, details about the Project will be displayed in the right side bar. Under the Contribute or Join button, you will find the tabs About, Protocols, Results and Discussion.
# About
The About tab will provide the description of the project, as well as a map with the project locations.
# Protocols
The Protocols tab list the protocol(s) used in the Project. Click on the Protocol title to show Protocol in the apps Protocol list.
# Results
The Results tab will list the number of contributions made to the Project so far, as well as a button labeled View Data to access and analyze the collected data on the website (make sure you are signed in on the website). If the project lead has provided result, they will be displayed underneath as well.
# Discussion
The Discussion tab allows you to discuss the Project in the same way you can discuss it on the website. You can start a new thread using the New Top button, or you can select an existing thread and reply to a comment. If you want to attach images to your comment, you can click on the picture icon next to the comment field and attach up to three images to your comment. You can use markdown to format your comment.
# Editing a Project
In case you are the Project Lead, you will see an Edit button next to the Contribute button. When you select the Edit button, it will bring up the Project on the website so you can edit it (make sure you are signed in on the website). The changes to the Project will be synchronized with the app automatically. In case you cannot see the changes, try to synchronize the app, selecting Synchronize from the left menu bar, File → Synchronize from the top menu bar or the shortcut Ctrl/⌥+Alt/⌘+S.
# Search
If you have long list of Projects, you can use the search field in the top left corner, by clicking into the input field or using the shortcut Ctrl/⌘+F and entering the search term followed by the enter key. Use the button inside the input field or the Esc key to reset the search and show the complete list again.
To find new Projects select the Search button from above the list of My Projects and the search field in the upper right corner will be automatically selected. Type in your search term followed by the enter key. The first 10 search results are shown. Scroll to the end of the list and click on the Load More button to see more results. More Projects will be shown in increments of 10 and more result are loaded as you reach the end of the list.
Click on a Project in the list of search results to see detailed information in the right side bar.
# Join a Project
If you search for Projects and you find a Project you would like to participate in, you can join them from the app using the Join button. The Project will be automatically added to your list of My Projects, as well as in the mobile application and will also be available under Collaborations on your user profile at the website.
Some Projects cannot be joined, since they are only accessible to a small group of people. These Projects are indicated by a small lock icon in front of the Project title.
# Contributing to a Project
To contribute to a Project, select a Project from the My Projects list and click on the Contribute button in the right side bar or just double click on the Project in the list. You can always go back to the list of your Projects by clicking on the back button in front on the Project title on the top.
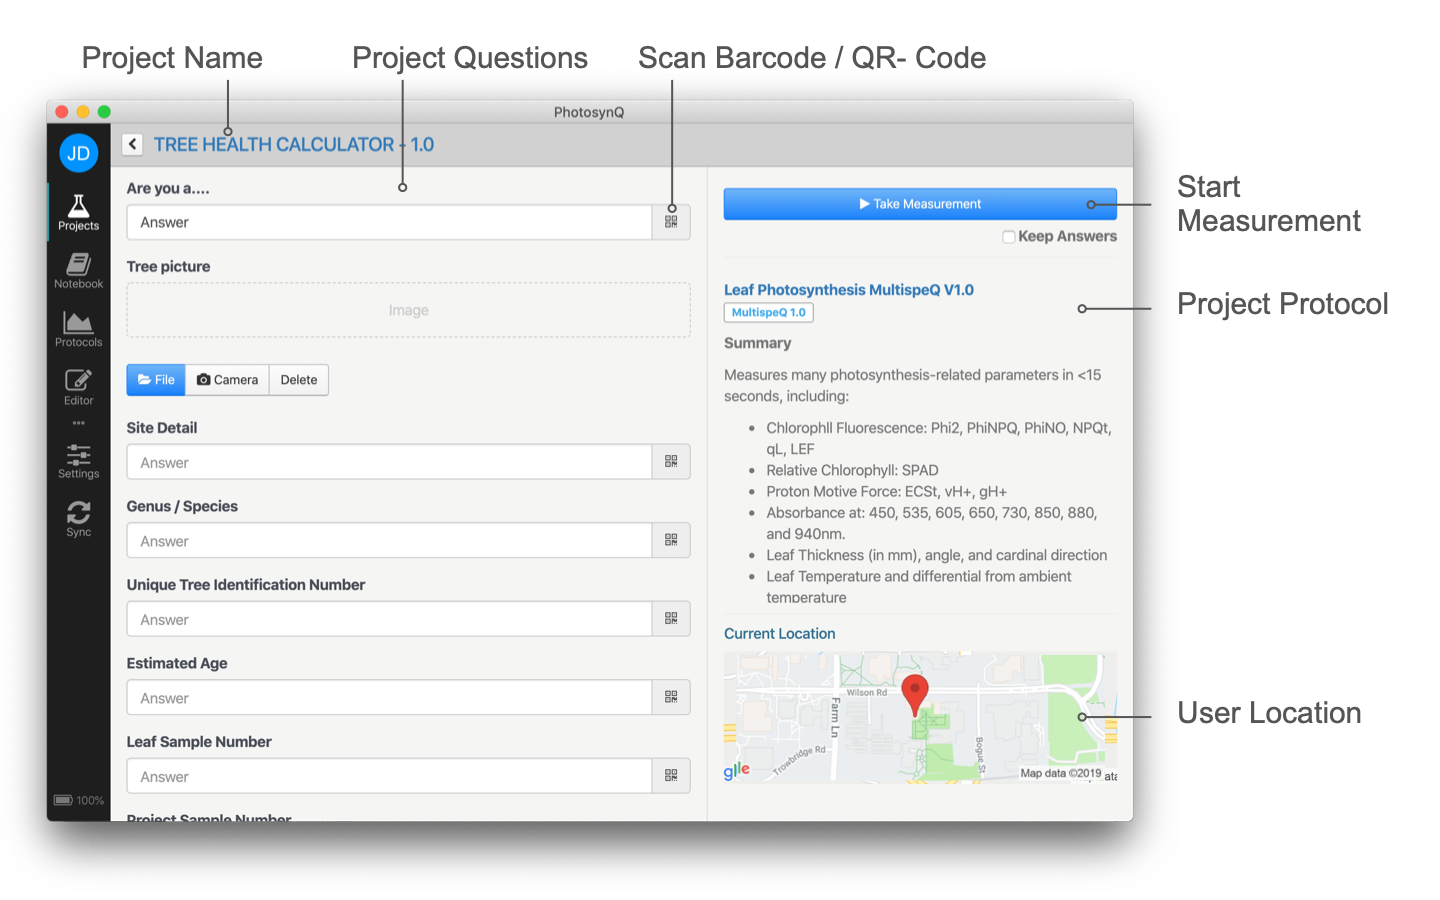
A list of all available Project questions will be displayed and depending on the type of question you will have the following input options:
- A dropdown list with available answers.
- An input field, if you have to enter an individual answer. A list of already given answers will be shown as you type.
- If the Project has images attached to the list of answers, select an image to answer the question.
# Answering Questions
You have to answer all Project Questions in order to contribute a measurement. You can select Keep Answers below the Take Measurement button, if you take multiple measurements with the same set of answers.
# Scan Codes
Answers can also be given by scanning Bar or QR codes (requires webcam). Select the scan icon next to the input field to use your webcam to scan a code. A dialog will open up and you can select the input source if you have multiple cameras, otherwise the standard camera will be selected. Hold the code in front of the camera to scan it. When the code was read successfully, the dialog will be closed and the code content added into the input field. You can close the dialog at any time using the Esc key.
# Taking a Measurement
Once you have answered all the Project Questions you can select the Take Measurement button in the right side bar. The measurement will use the protocols listed underneath the button, as well as your Current Location as indicated on the small map. If no location information is available, you will see the warning Unknown Location. In this case you can still contribute a measurement, just laking the geo tag.
Note
When you push the Take Measurement button, the measurement, depending on the Protocol, might start right away.
# Save Contribution
After the measurement has been taken, you can save the results to the Project using the Save button above the measurement results or you can Discard the measurement and repeat it. When you want to save your measurement, you can add notes and an image either using a local file or your webcam and then save it to the Project using the Save button at the bottom of the dialog. When you don't have an internet connection your measurement will be cached and submitted to the Project the next time you have a connection and the app is able to synchronize.