# Create / Edit a Protocol
When getting started using the PhotosynQ platform with an instrument like the MultispeQ, several preset measurement Protocols are provided. These Protocols have Macros connected that calculate a defined set of parameters from the measurement data. If your experiment requires more or different parameters or an altered Protocol, you can setup your own measurement Protocol or make changes to an existing one.
# Create New Protocol
- Make sure you have the Desktop Application installed and you are signed in.
- Navigate to File → New Protocol... to open the Protocol Editor and start a new Protocol.
- Connect the Instrument you want to use the Protocol with.
- Check out the documentation on individual commands in the here.
- Make sure you have your Instrument connected properly, so you can click on
Runor use the shortcut Ctrl/⌘+↵ to test your Protocol - Now you can start building your Protocol...
Tip
Use Run or the shortcut Ctrl/⌘+↵ to test your Protocol at any time.
# Edit a Protocol
You can change one of your Protocols or extend an already existing one at any time.
- Select Protocols from the left menu bar.
- Click on the Protocol in the list and click on Edit in the sidebar.
- Make your changes to the Protocol.
- Select Save as... from the File menu or use the shortcut Ctrl/⌘+Shift/⇧+S.
- Update the description if needed.
- Save the changes by Save As.
Tip
Often it is easier to start altering an already existing Protocol. To save it change the name too and the only option available is Save as.
# Save a Protocol
Once you have finished your Protocol, save your work to use it in your Projects and to share it with the community.
- When you have the Protocol Editor open, select Save from the File menu or use the shortcut Ctrl/⌘+S.
- In the save dialog, add a Protocol name, description and pick a Protocol category.
- Make sure, the correct macro is connected (not mandatory)
- Save the Protocol by selecting Save.
# Troubleshooting
If you have issues saving the Protocol, make sure you check these things first:
- When a Protocol is finished, no warnings or errors are indicated.
- Make sure you have a name, description and category.
- Check that the name is not already existing.
# Example - Photosystem II efficiency
In this tutorial, we show you how to acquire a simple Phi2 value using the MultispeQ. Before we start, lets take a look at the measurement.
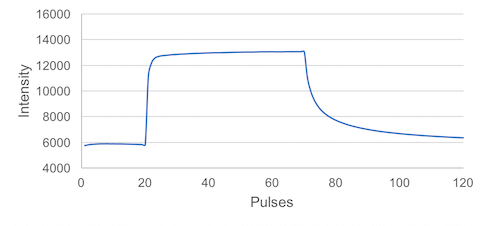
The Measurement can be divided up into three parts:
- 20 Pulses at ambient light intensity
- 50 Pulses at a saturating light intensity
- 20 Pulses at ambient light intensity
This is all we need to record the photosystem II quantum efficiency, or Phi2.
# Pulses
A measurement is divided into pulses. Pulses can be grouped into pulse sets. The example below shows a total of 90 pulses grouped into 3 pulse sets. Most of the following parameters require you to define those 3 groups. pulses defines those groups, pulse_distance defines how far apart each pulse is (in µs). The command pulse_length defines the pulse duration in µs.
[
    {
        "pulses": [
            20, 50, 20
        ],
        "pulse_distance": [
            10000, 10000, 10000
        ],
        "pulse_length": [
            [ 30 ], [ 30 ], [ 30 ]
        ],
        ...
    }
]
# Pulsed lights
Once we have defined are pulse groups, we need to define the lights we want to use to probe the fluorescence. pulsed_lights defines which lights are pulsed during each pulse set. 0 means that there is no light pulsing, 3 uses the 605 nm LED (amber), Lumileds LXZ1-PL01. pulsed_lights_brightness defines the light intensity of each pulse. Since multiple lights can be pulsed, lights or brightness are written like [3] this and not simply like 3. Multiple light would be written in this way: [2,3].
[
    {
        ...,
        "pulsed_lights": [
            [ 3 ], [ 3 ], [ 3 ]
        ],
        "pulsed_lights_brightness": [
            [ 2000 ], [ 2000 ], [ 2000 ]
        ],
        ...
    }
]
# Non Pulsed Lights
In this protocol we need an actinic light (which is not pulsed), so the plant has light available to continue doing photosynthesis during the measurement. To set the intensity we use the command light_intensity to reproduce the ambient light intensity, which is recorded by the PAR sensor. Light 2 is the 655 nm LED (red), Lumileds LXZ1-PA01.
 [
    {
        ...,
        "nonpulsed_lights": [
            [ 2 ], [ 2 ], [ 2 ]
        ],
        "nonpulsed_lights_brightness": [
            [ "light_intensity" ], [ 4500 ], [ "light_intensity" ]
        ],
        ...
    }
 ]
# Detectors
Next we have to define the detector we want to use to record the fluorescence coming off the leaf. We use the command detectors to define which detector we will use for each pulse set. Since we can use multiple detectors per pulse set we use [1] instead of the 1 notation (using two detectors would look like this: [1,2]). When the detector is set to 0 no data is captured. Detector 1 is the 700 nm - 1150 nm, Hamamatsu S6775-01.
[
    {
        ...,
        "detectors": [
            [ 1 ], [ 1 ], [ 1 ]
        ]
        ...,
    }
]
# Environmental Parameters
To record the ambient light intensity required for the non pulsed lights intensity, we have to add a command to include the PAR sensor using light_intensity. This is also where you could add other environmental parameters like temperature, relative humidity, etc, depending on the sensors available in your Instrument.
[
    {
        ...,
        "environmental": [
            [ "light_intensity" ]
        ],
        ...
    }
]
# Starting the Measurement
To start the measurement as soon as we have clamped the leaf, in order to perturb it as little as possible, we add the following command: 1 indicates the measurement starts as soon as the clamp is closed and 0 starts the measurement as soon as you select Start Measurement on your device.
[
    {
        ...,
        "open_close_start": 1
    }
]
# The final Protocol
Putting all the pieces together, the protocol to measure Phi2 looks like this:
[
    {
        "pulses": [
            20, 50, 20
        ],
        "pulse_distance": [
            10000, 10000, 10000
        ],
        "pulse_length": [
            [ 30 ], [ 30 ], [ 30 ]
        ],
        "pulsed_lights": [
            [ 3 ], [ 3 ], [ 3 ]
        ],
        "pulsed_lights_brightness": [
            [ 2000 ], [ 30 ], [ 30 ]
        ],
        "nonpulsed_lights": [
            [ 2 ], [ 2 ], [ 2 ]
        ],
        "nonpulsed_lights_brightness": [
            [ "light_intensity" ], [ 4500 ], [ "light_intensity" ]
        ],
        "detectors": [
            [ 1 ], [ 1 ], [ 1 ]
        ],
        "environmental": [
            [ "light_intensity" ]
        ],
        "open_close_start": 1
    }
]
# Save the Protocol
Now it is time to save the Protocol so you can use it in the future. Select Save from the File menu or use the shortcut Ctrl/⌘+S to save the Protocol to the PhotosynQ platform. Provide a meaningful name, description and select a category your Protocol falls into. You don't have to select a Macro at this point, since you don't have one created yet.
# Take a Measurement
When you have saved your protocol, go ahead and take a Measurement using a plant, so you get realistic data. Once the Measurement is done, save it to your Notebook, so you can use it to create your Macro.
# Add a Macro
In order to process the Measurement and calculate you need to associate a Macro with your Protocol. See the tutorial Building a Macro on how to build a Macro and process the data coming out of the protocol you have just created.
# Example - Advanced Protocol
In the previous tutorial we showed you how to write a Protocol for a simple Phi2 measurement. Make sure you are familiar with this first example, before you tackle this next tutorial. Here we want to explain to you how to build a complex Protocol, which combines simple Protocols like the Phi2 from the previous example into one set of Protocols, a Protocol Set.
Tip
The advantage of using a Protocol with a Protocol set, rather selecting multiple Protocols to be executed one after another is, that your Macro has access to all protocols inside that set.
# Protocol Sets
The key to chain multiple Protocols together into one is the _protocol_set_ command. In the example below, you see how the command is used inside a Protocol. All Protocols you would like to execute as one you can put into the _protocol_set_ array. For example you can copy and paste existing protocols into the _protocol_set_: [...]. Make sure you remove the square brackets [{Protocol}]
[
    {
        "_protocol_set_": [
            // All your protocols go in here
        ]
    }
]
# Macro required!
In contrast to regular Protocols, when using Protocol Sets you have to use a Macro in order to output Parameters. That way, you have full control over the output of complex measurement Protocols (see Building Advanced Macros).
# Special Commands
There are a couple of commands to allow Protocols inside a Protocol Set to communicate with each other, meaning information like light intensity can be transferred from one Protocol to the next. This is not possible if regular Protocols are chained together (select multiple Protocols during Project creation).
# Labels
The command label allows to give every Protocol within a Protocol Set a name, so it is easier to identify when creating a Macro.
# Previous Light Intensity
The command previous_light_intensity allows to measure the light intensity in the first Protocol and re-use it in all the subsequent Protocols instead of measuring it each time. The light intensity used and displayed in the subsequent Protocols will be the same as in the first one.
# Building a Protocol Set
[
    {
        "_protocol_set_": [
            {
                "label": "Phi2",
                "pulses": [
                    20, 50, 20
                ],
                "pulse_distance": [
                    10000, 10000, 10000
                ],
                "pulse_length": [
                    [ 30 ], [ 30 ], [ 30 ]
                ],
                "pulsed_lights": [
                    [ 3 ], [ 3 ], [ 3 ]
                ],
                "pulsed_lights_brightness": [
                    [ 2000 ], [ 2000 ], [ 2000 ]
                ],
                "nonpulsed_lights": [
                    [ 2 ], [ 2 ], [ 2 ]
                ],
                "nonpulsed_lights_brightness": [
                    [ "light_intensity" ], [ 4500 ], [ "light_intensity" ]
                ],
                "detectors": [
                    [ 1 ], [ 1 ], [ 1 ]
                ],
                "environmental": [
                    [ "light_intensity" ]
                ],
                "open_close_start": 1
            },
            ...
        ]
    }
]